PrismFinance
← All guides
Variable income

Organise uneven months without mixing forecasts and payments

Learn to record partial payments, compare periods, track limits and speed up common entries.

◷ 25–35 min of practice◎ Finish with identifiable payments, a comparison method, a template and a routine for reviewing changes.
BEFORE YOU START

What you will need

  • Dates and amounts for several actual payments.
  • A pending-payment list separate from received payments.
  • Previous months’ records if you want to compare periods.

Images are Android screenshots from an English-language version of Prism. Boxes and arrows point to the explained control; language, names and layout may differ in your version or platform.

01
Onboarding and Settings

Set up your starting point

In onboarding choose “Variable income”, then your first priority: Daily control, Budget, Debt, Savings and emergency or Tax planning. These preferences personalise the experience; they do not change your recorded amounts.

If you already use Prism, open Settings and look for your financial focus or the option to reopen onboarding. Also check your currency and the categories you will use. Screen names and layouts may differ across Android, iOS and web.

Do this
  1. Select “Variable income” as your personal profile.
  2. Choose one priority to start with and continue until confirmation.
  3. Open the menu and find Records, the records list and the tools for your priority.
✓ What you should see

Your profile is selected and you know where to record and review entries.

✦ Tip

If a tool is missing, check menu customisation in Settings. You can change your focus later.
02
Records → Income

Separate expected and received payments

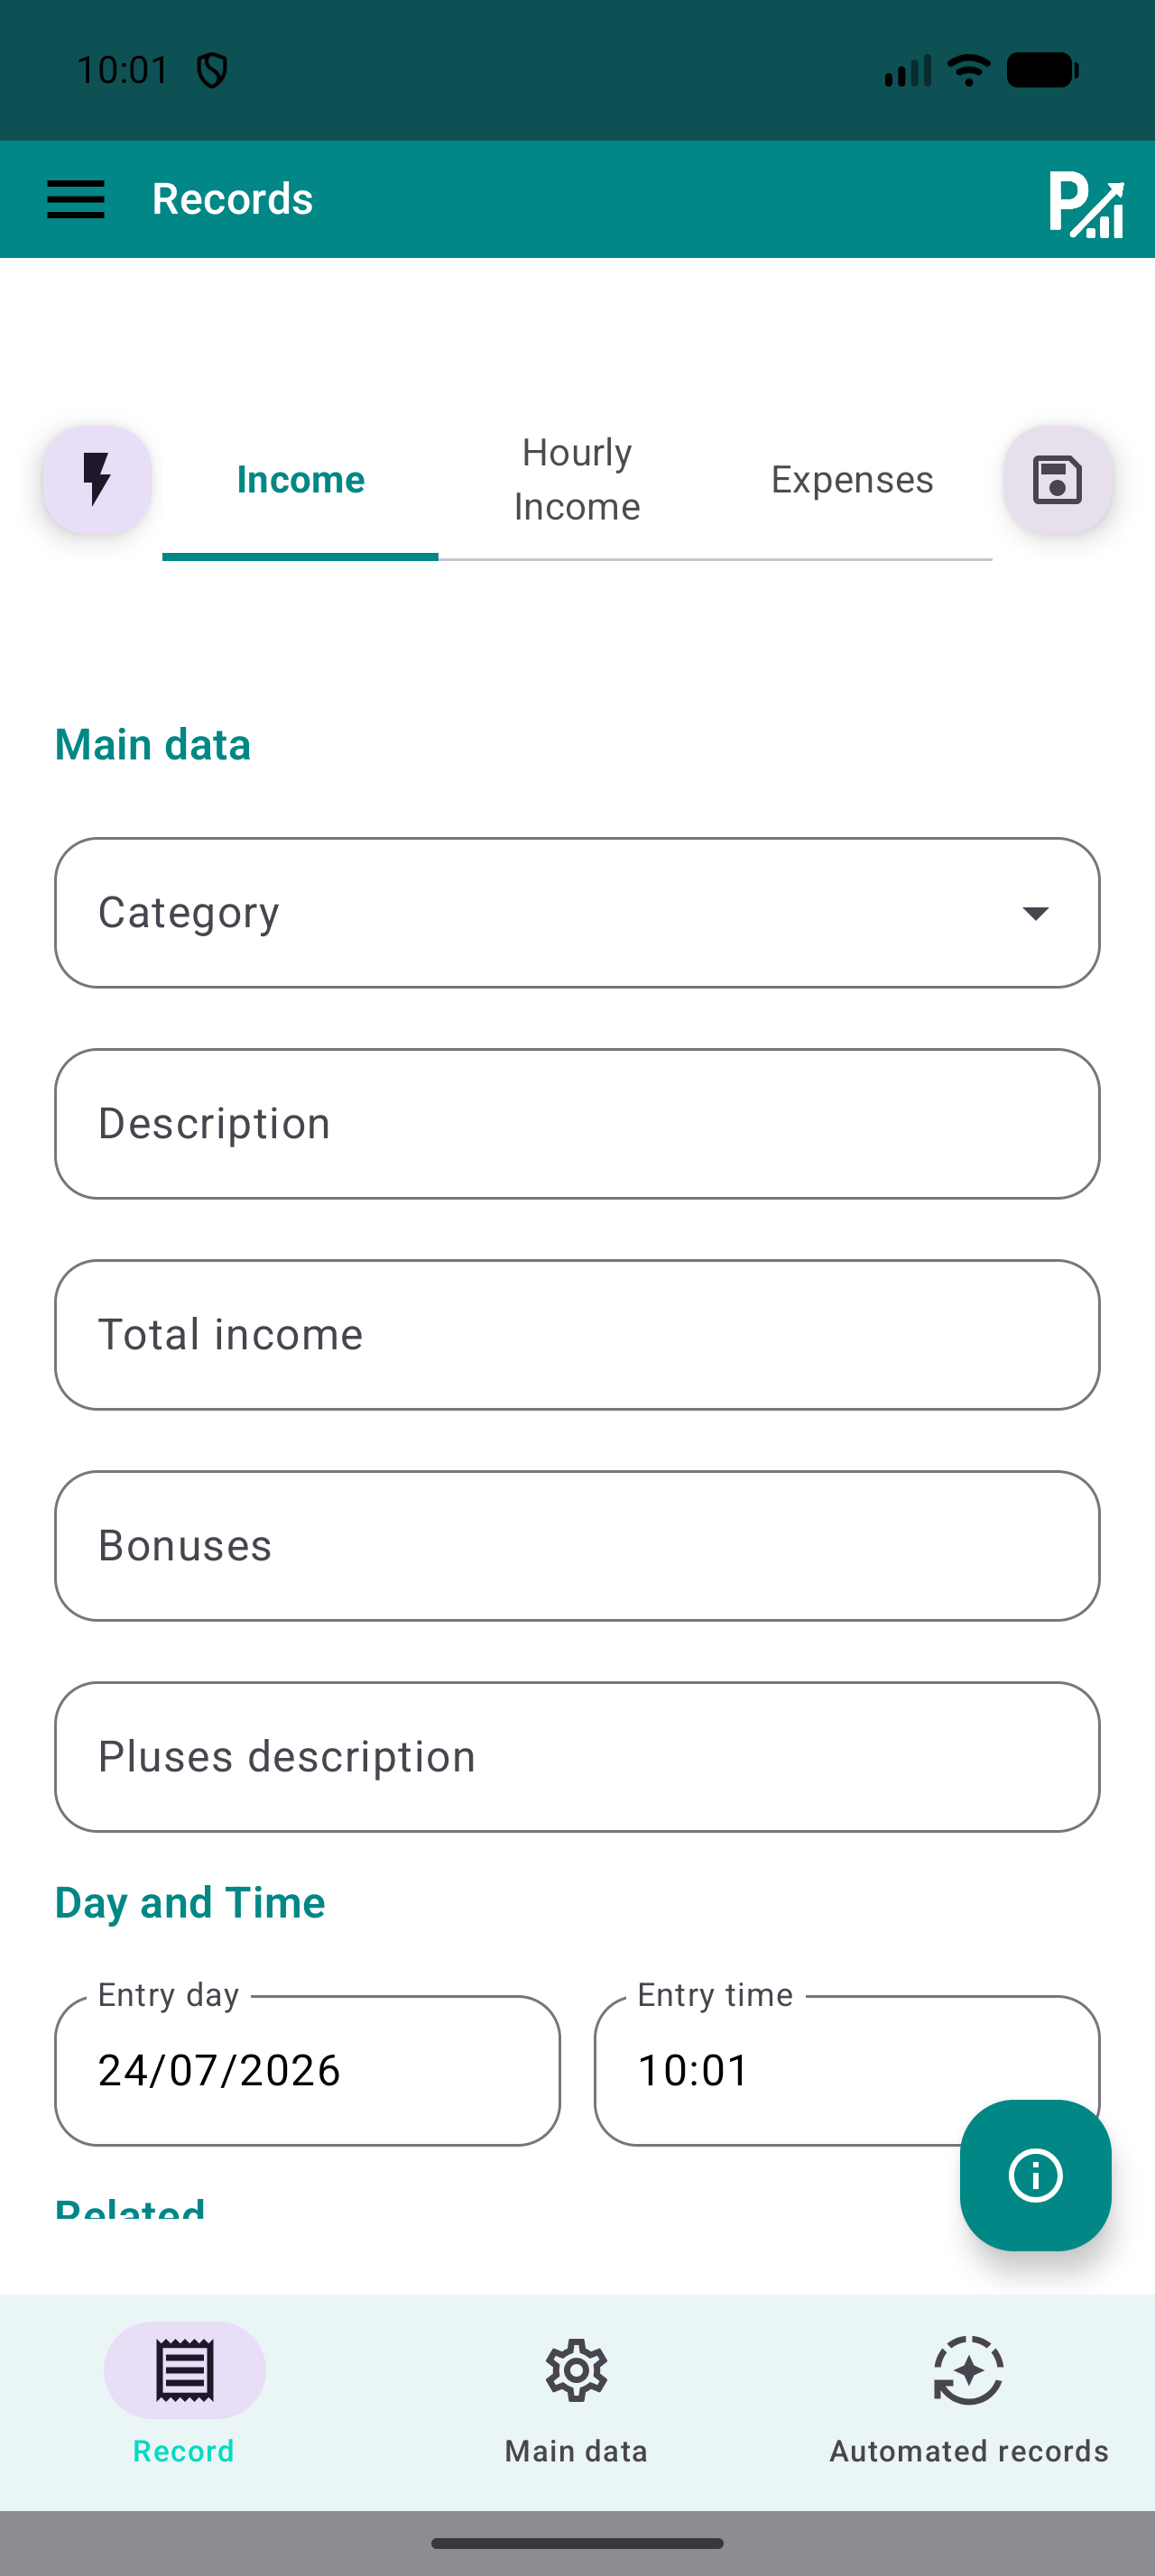
Keep your list of jobs or pending payments as a planning reference. In Records, add each income entry with the actual amount and date when received. Use a description identifying its source, such as “October shifts” or “Design project”.

If payment arrives in instalments, record each receipt on its own date with a consistent description. An accepted job, issued invoice or prediction does not equal available money. If you use future entries in your workflow, identify them and check which periods your reports include.

Do this
  1. Check the amount actually received.
  2. Enter its category, payment source and actual date.
  3. Save and find that payment in the records list.
✓ What you should see

Your income records reflect identifiable payments without mixing in estimates.

✦ Tip

If you expected 400 and receive 250 now, record 250; the remainder stays on your pending-payment reference.

Prism record form showing category, description, amount and date.
The category organises the record; the description helps you recognise it later.
03
Records → Expenses

Give each expense a useful category

Select Expenses and record an actual payment. Separate, for example, Food, Housing, Transport and Leisure. Add a short description you can search later; consistent categories make budgets and analysis easier to interpret.

If you have configured accounts or tags, check the association before saving. Start with a short category list rather than several almost identical categories. Do not record a payment again just because it also appears on a receipt or statement.

Do this
  1. Select Expenses and the appropriate category.
  2. Add the description, amount and payment date.
  3. Save and confirm the record is an expense, not income.
✓ What you should see

Your actual expenses are organised into recognisable categories.

✦ Tip

Always use “Food” for groceries instead of alternating between similar categories.

Prism record form showing category, description, amount and date.
The category organises the record; the description helps you recognise it later.
04
Records list and Statistics → Budgets

Compare periods before choosing limits

Review several complete months with the same filters. Distinguish received income, usual expenses and exceptional entries. A month with an unusual payment can distort the comparison if you assume it will recur.

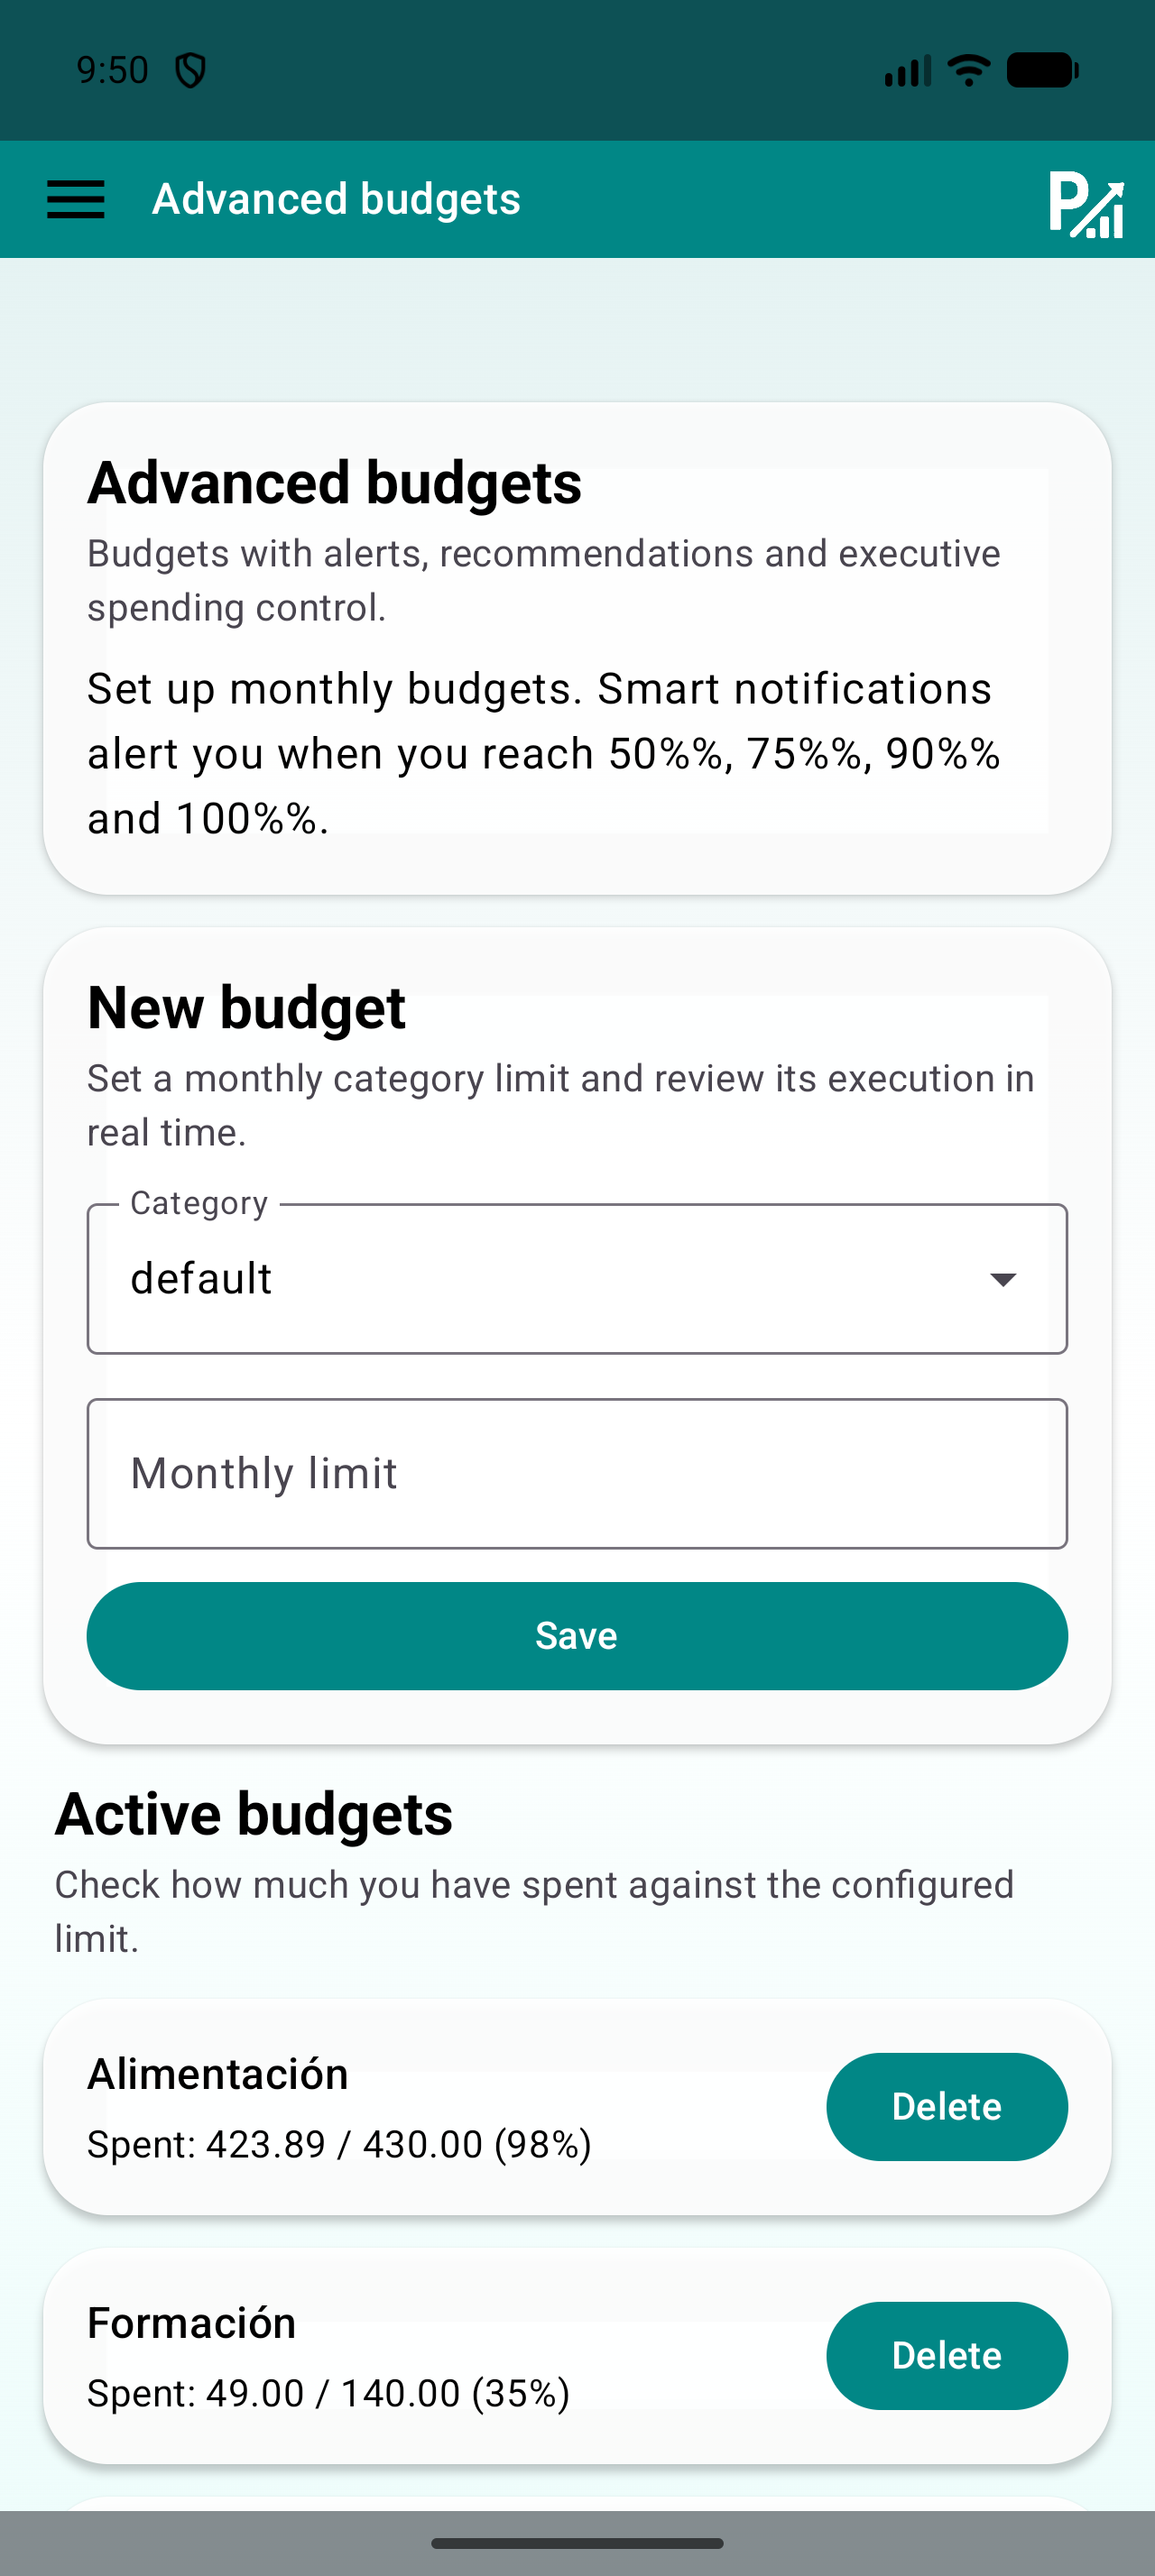
Use those records to choose tracking limits that make sense for your situation and create category budgets. Review the margin when a new payment is confirmed. If your situation changes, adjust the plan explicitly and keep a reference of what changed.

Do this
  1. Select complete months and use comparable filters.
  2. Identify unusual payments and regular expenses.
  3. Create or review category limits and check their usage.
✓ What you should see

Your limits are based on reviewed records and you can explain differences between months.

✦ Tip

The Predictive calendar shows data-based scenarios. Compare them with confirmed payments before using them for planning.

Budget screen with a category selector, monthly limit and Save button.
The limit belongs to a category. Make sure your expenses use that same category.
05
Menu → Goals

Define a goal and review its progress

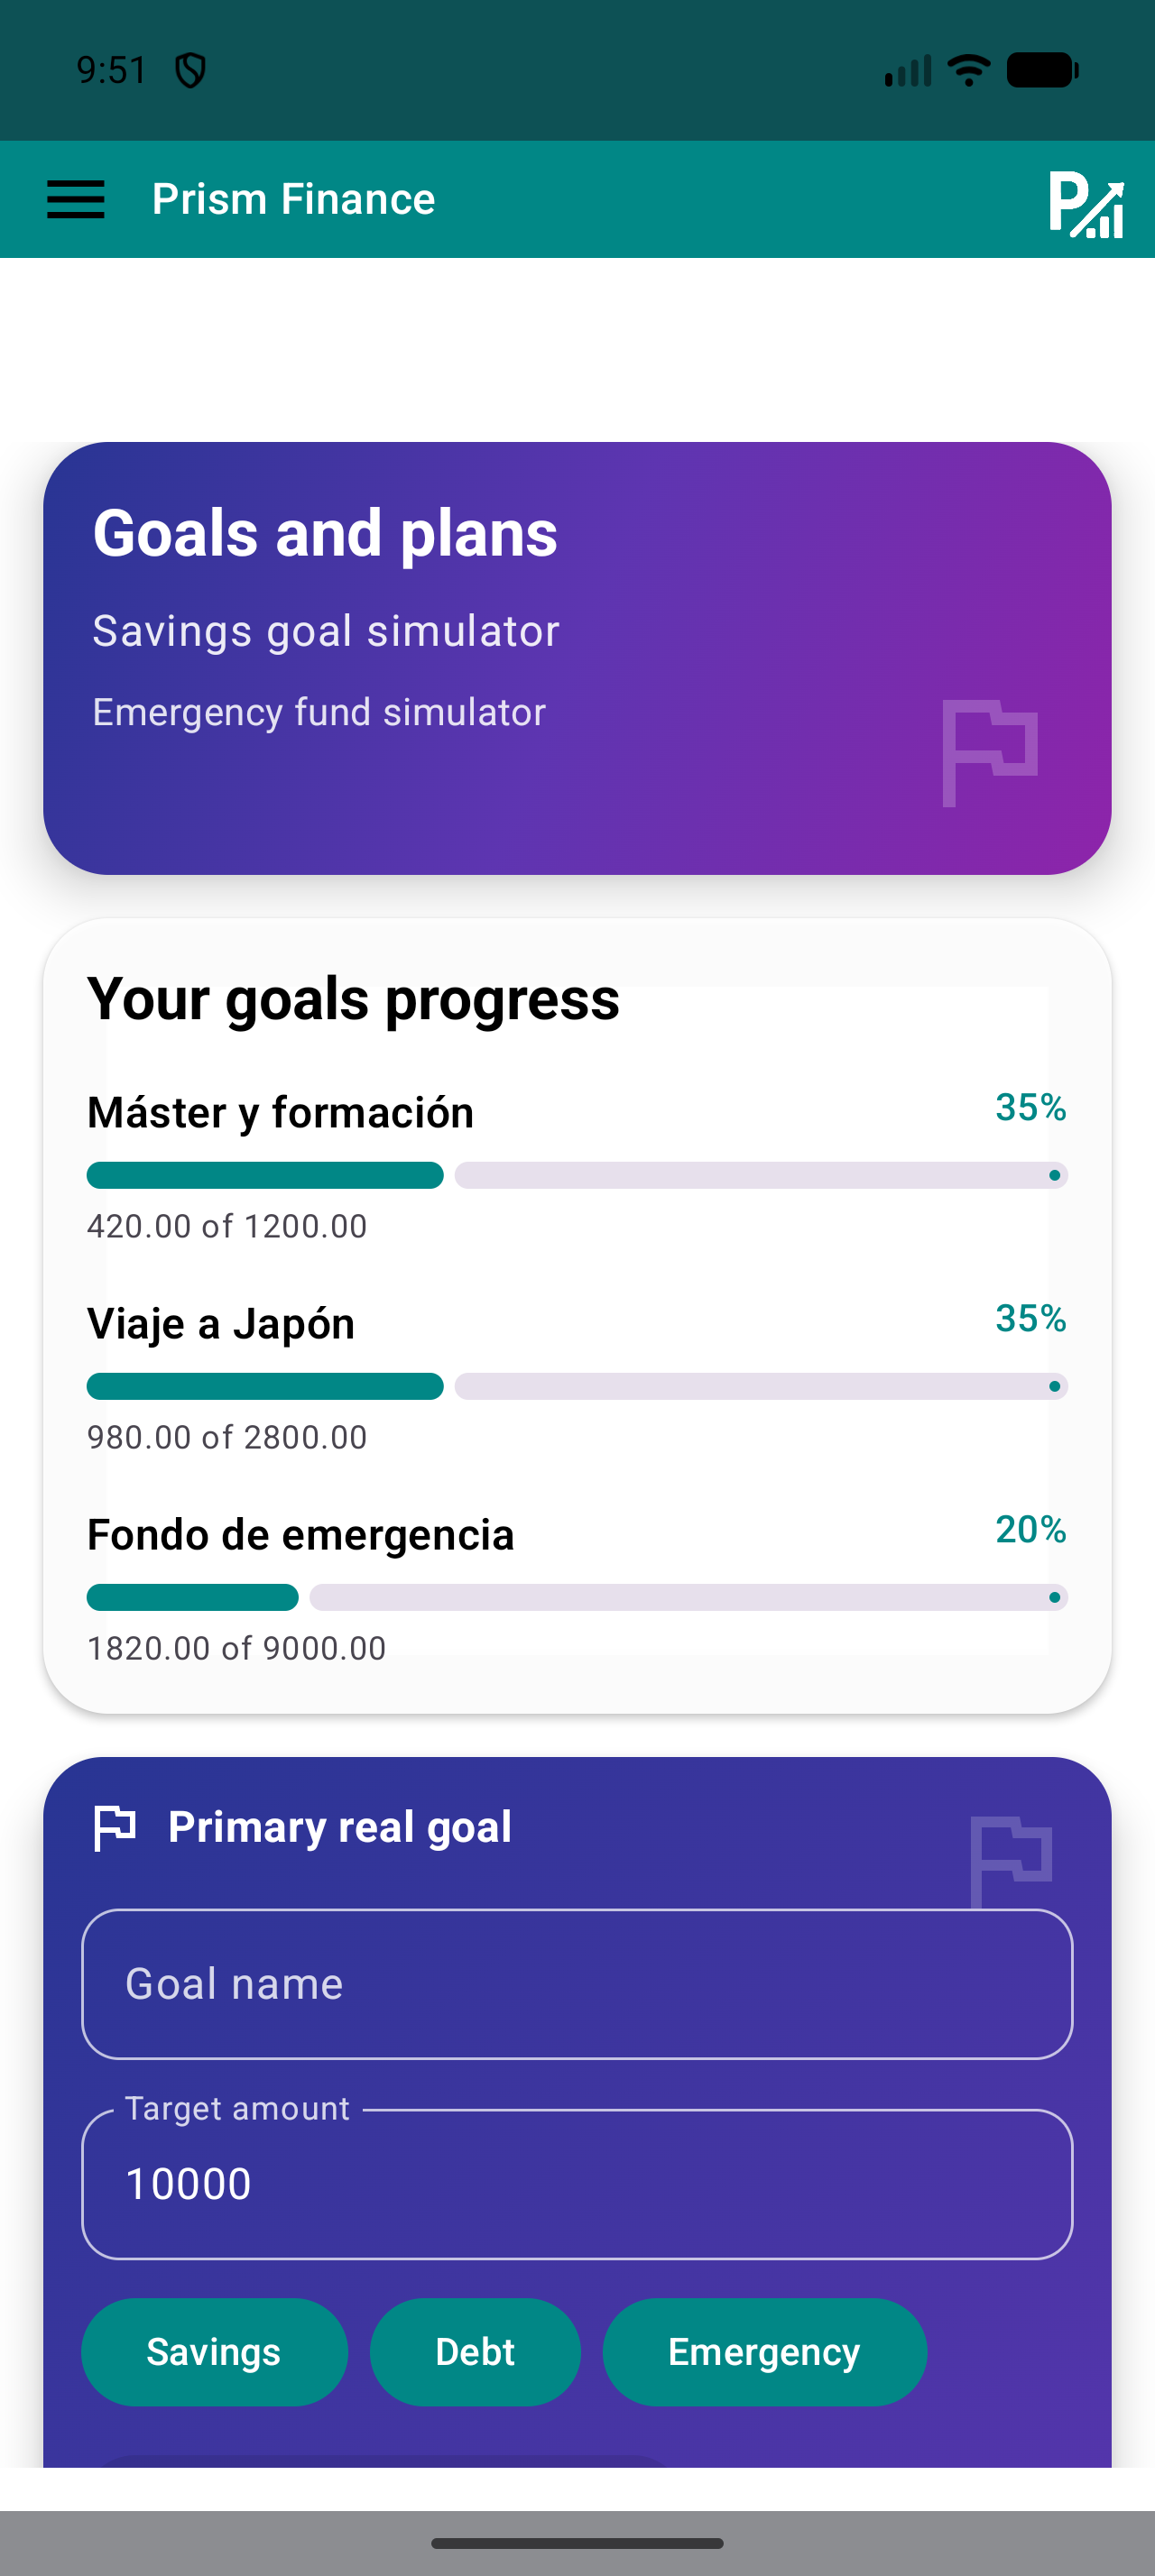
Open Goals and choose a concrete name such as “Personal reserve” or “Training”. Enter the target amount and select the appropriate type. Use the tracking options available in your version to reflect actual progress.

A goal or simulator helps organise a plan; it does not instruct a bank transfer. Before interpreting the percentage, check the target amount and the progress shown on screen. Keep actual contributions and estimates clearly identified.

Do this
  1. Enter the goal name and target amount.
  2. Choose the type and confirm using the control available in your version.
  3. Review the progress and compare it with your actual contributions.
✓ What you should see

You have an identifiable goal whose progress you can review without confusing it with transferred money.

✦ Tip

Start with a goal you can explain in one sentence and review it at the same time each week.

Goals screen with a goal name, target amount and Savings, Debt and Emergency types.
Choose a recognisable name and check the amount and goal type before confirming.
06
Quick templates → Records

Create a shortcut while checking every entry

Open Quick templates and prepare a preset for income, an expense or hourly work you often record. Choose the common details supported by your version: description, category or tags, amount and associations.

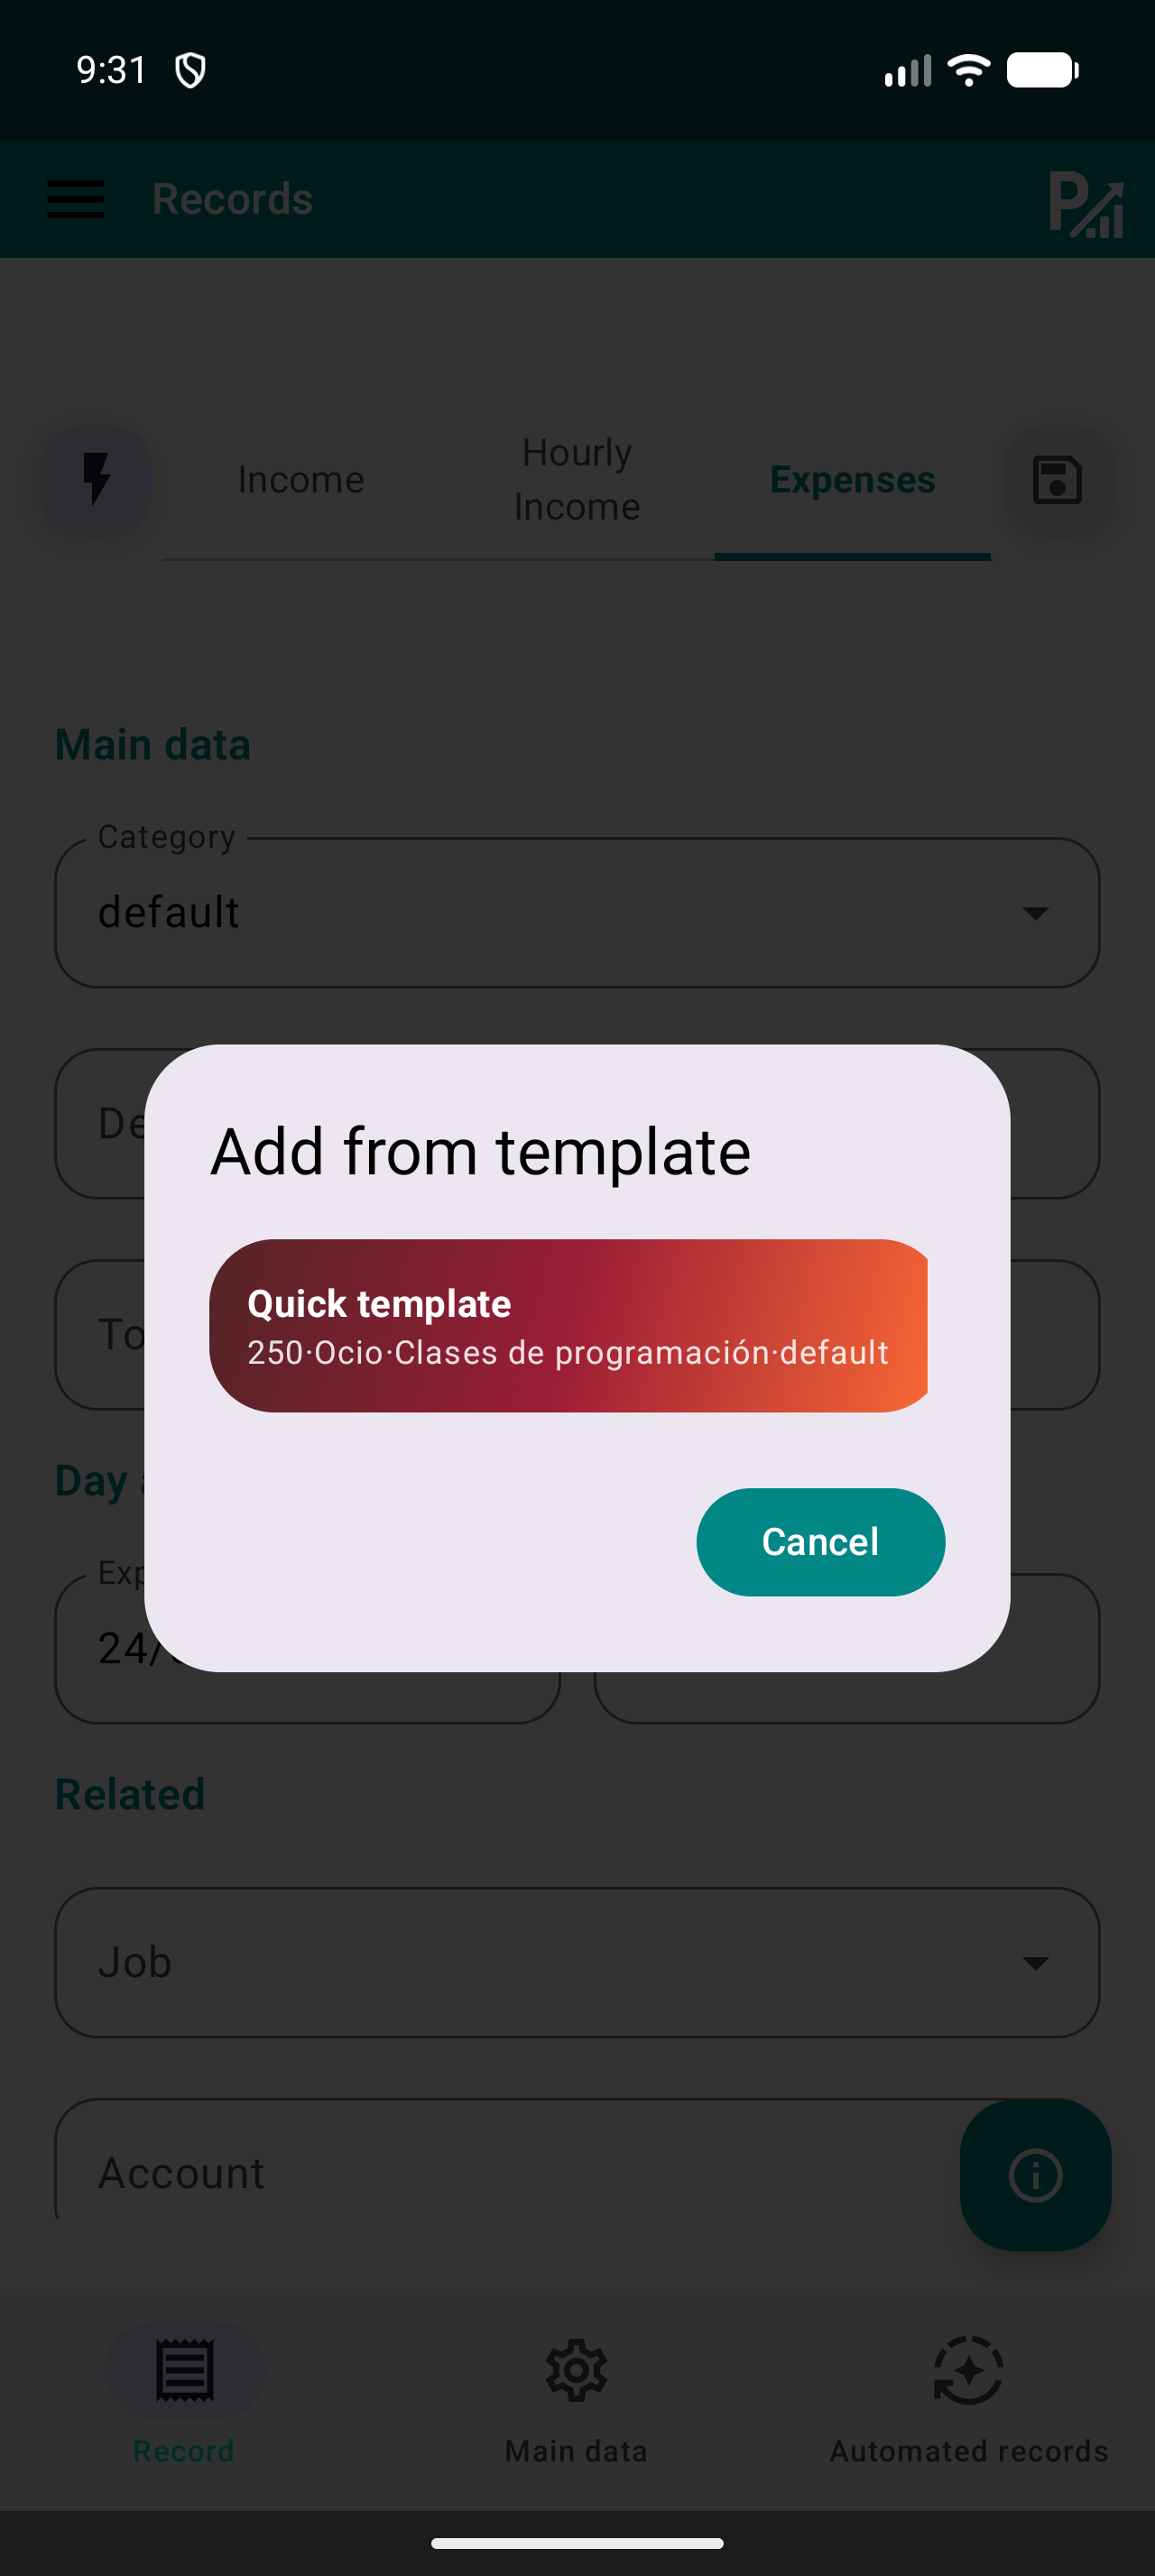
To use it, select the template from Records or the templates list. Check the form before saving: today’s date, amount or hours may differ. A template speeds up entry; it does not prove that payment occurred.

Do this
  1. Prepare a template with repeated details.
  2. Select it to open or complete the form.
  3. Update the date and amount and save once.
✓ What you should see

You can reuse common details while keeping each record accurate.

✦ Tip

Review old templates when a rate or category changes.

Quick template selector in the Prism record form.
The template fills common details. Check the amount and date of the current record.
07
Records list → Calendar → Charts or Statistics

Review weekly and close the month

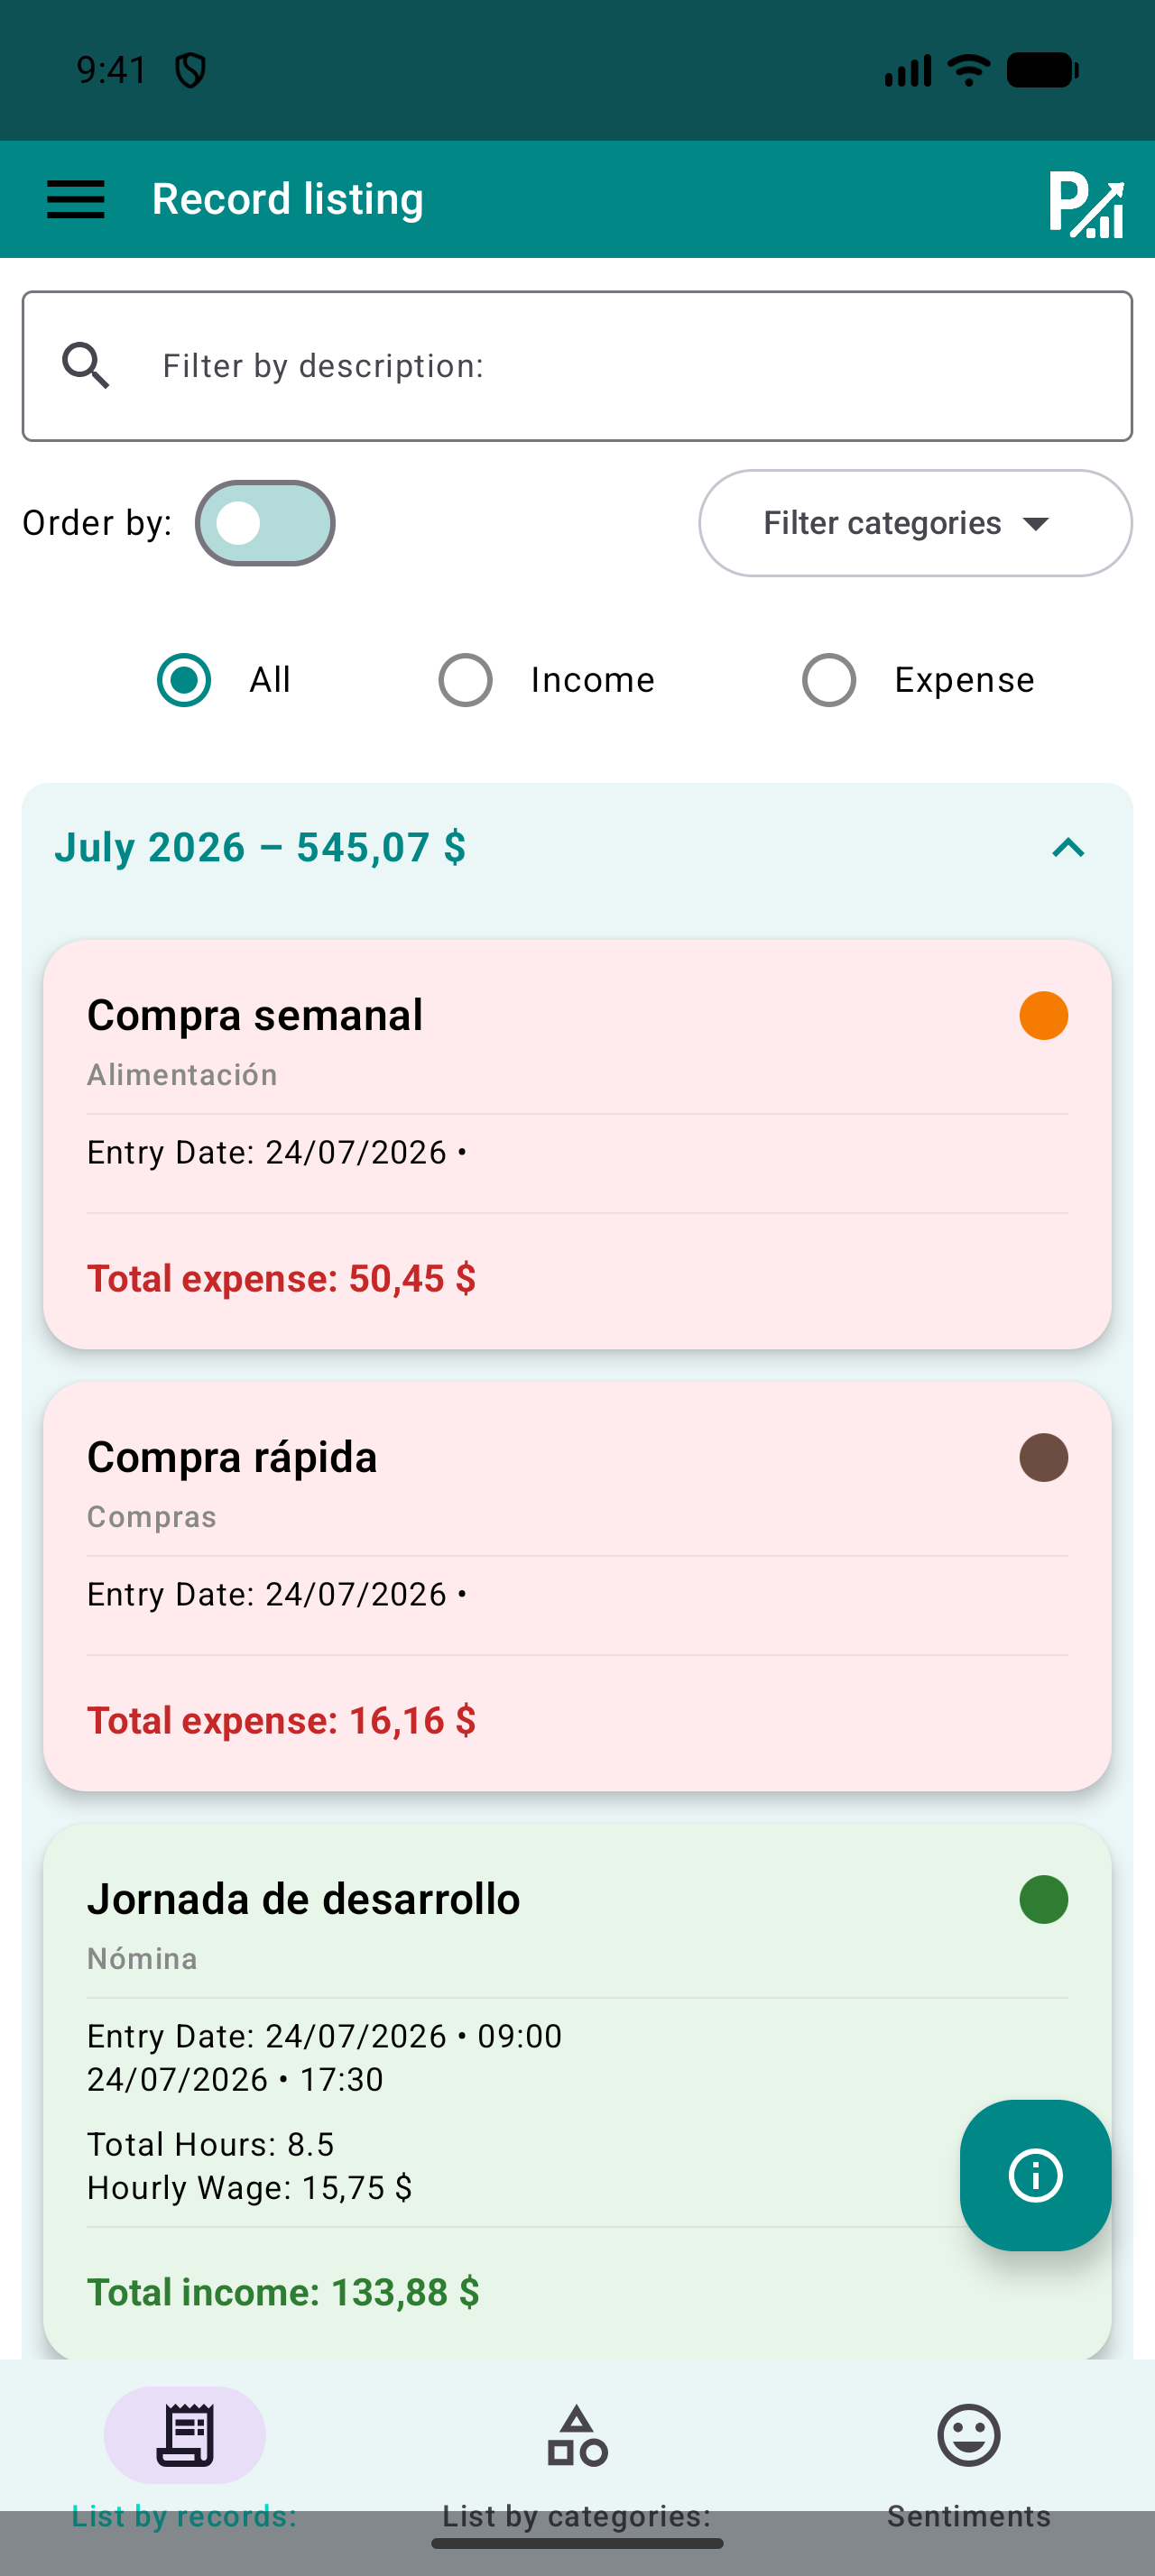
In the records list, search descriptions and use type and category filters to find the entries you want to review. Check amounts, dates and repeated records. The Calendar helps locate days with activity; colours do not replace reading the details.

At month end, use the same period in Charts, Statistics and Budgets. Compare the result with receipts you keep and note the category or habit to review next month. Your records balance depends on what you entered and may differ from your bank balance.

Do this
  1. Filter the week’s records and check the details.
  2. Correct mistakes in the original record.
  3. At month end, compare tools using the same period.
✓ What you should see

The period is reviewed and you know which entries underpin your charts and budgets.

✦ Tip

Keep reviews short and regular. Checking ten entries promptly is usually easier than reconstructing several months.

Prism records list with description search, category filters and income or expense filters.
Search descriptions and narrow the category or type to review specific records.
08
Menu → Export / Backup

Keep a copy and check the export

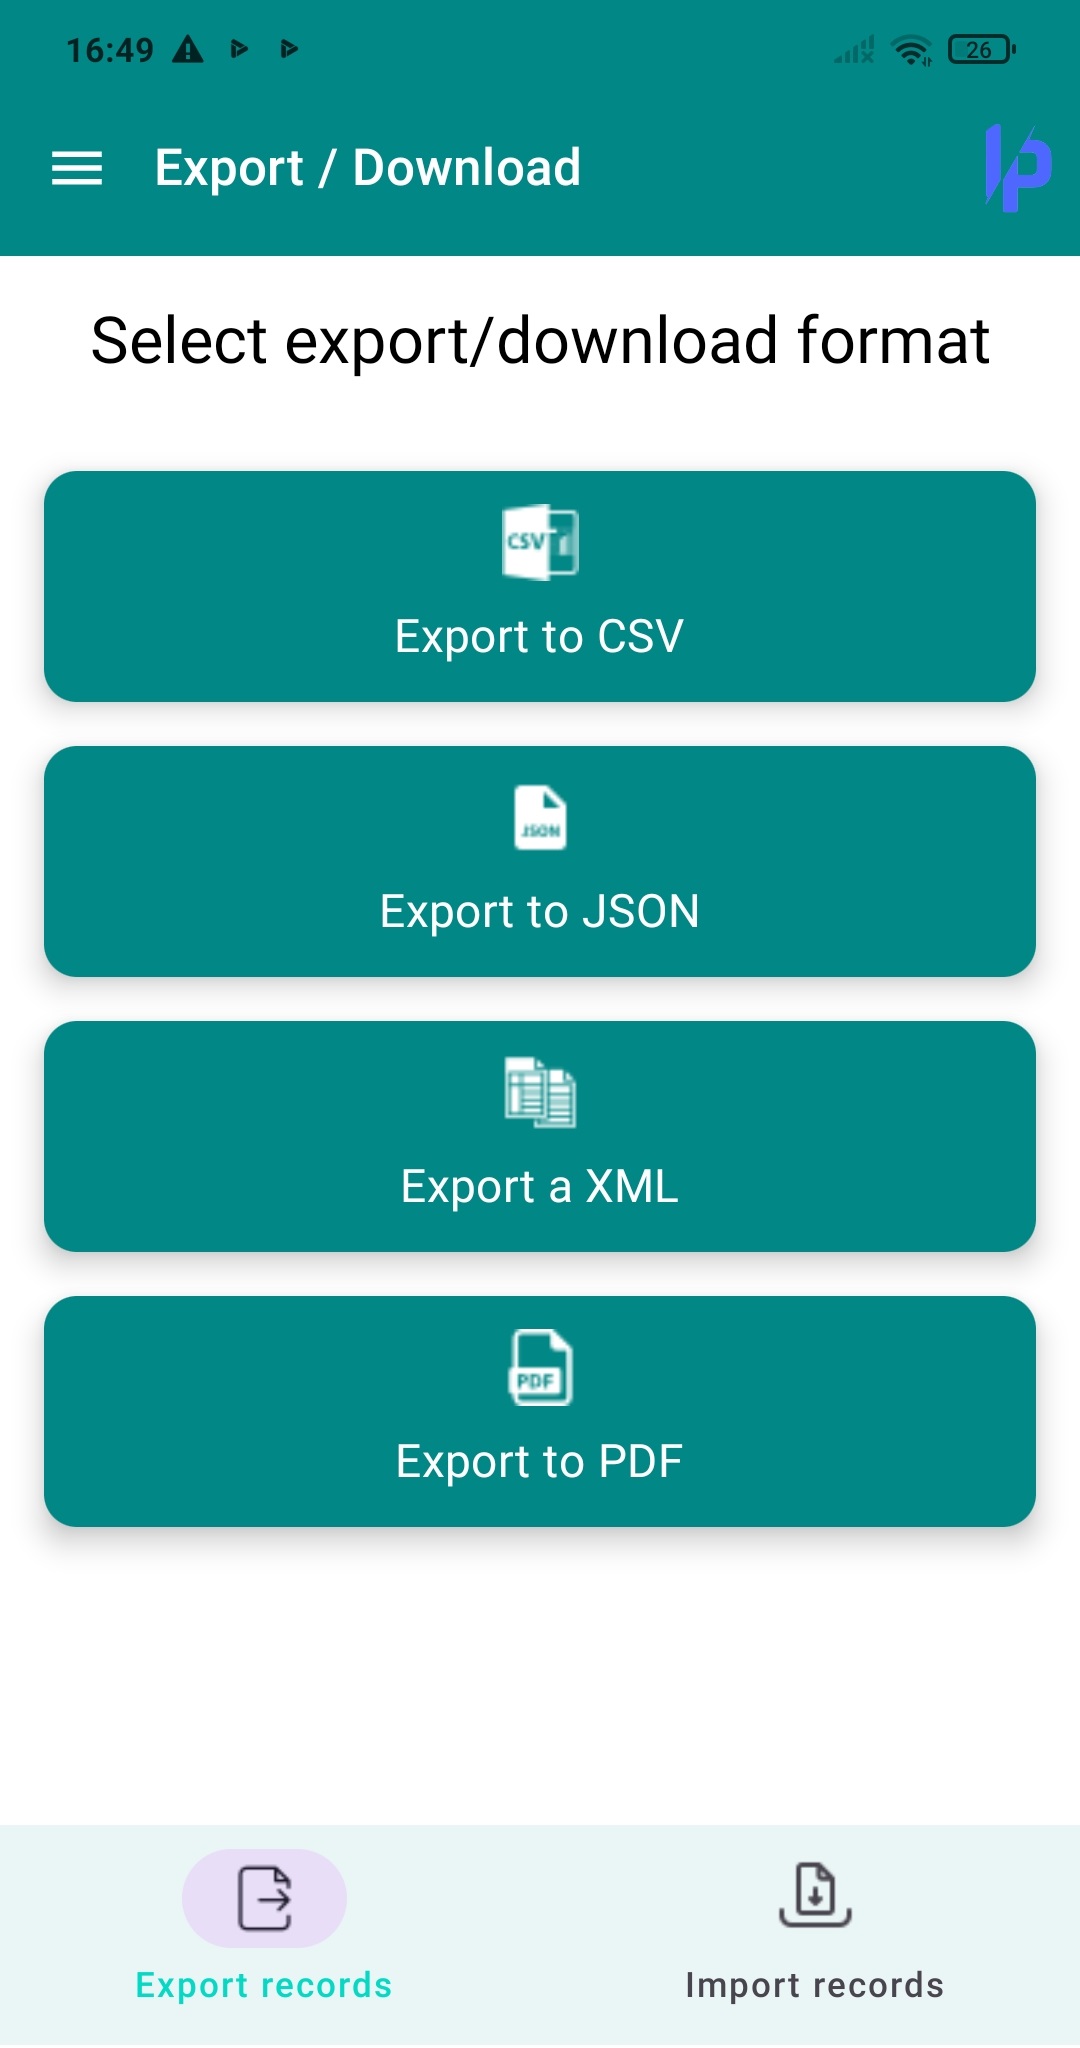
Find Export or Backup in your version. Choose an available format for your intended use and save the file in a private location. Open the export and check it includes the expected period and entries.

An export for reviewing data and a restorable backup may serve different purposes. Before changing devices or restoring, check the supported format, keep the previous copy and review your version’s restore instructions. Do not assume CSV can recover all settings.

Do this
  1. Open Export or Backup and choose the appropriate format.
  2. Save the copy with a recognisable date.
  3. Open the file and check its contents before relying on it.
✓ What you should see

You have a checked file and know whether it is intended for review or restoration.

✦ Tip

Files may contain your financial data. Only share a file you have reviewed with someone you have chosen.

Prism Export screen showing CSV, JSON and XML options.
Choose a format available in your version and check the downloaded file.
WRAP UP

Quick checklist

  • I distinguish received income from pending payments.
  • Partial payments have their own dates.
  • I compare complete months with the same filters.
  • I reviewed my template and saved an export.
AVOID THESE MISTAKES

Common mistakes

Recording a promise as a payment

Check the date and amount received; keep forecasts as an identified reference.

Comparing different periods

Use complete months and the same filtering method before interpreting a difference.

Automating an uncertain amount

Check each payment; a template lets you review the amount before saving.

NEXT STEP

Keep exploring

Follow us